 MongoDB入门实践
MongoDB是一个基于分布式文件存储的数据库,由 C++ 语言编写,旨在为WEB应用提供可扩展的高性能数据存储解决方案。
# 安装
入门实践第一步:环境搭建。MongoDB官方下载地址 (opens new window),以下操作基于Linux系统。
下载:
wget https://fastdl.mongodb.org/linux/mongodb-linux-x86_64-3.6.14.tgz
解压:
tar zxvf mongodb-linux-x86_64-3.6.14.tgz
mongodb开箱即用,不需要配置和编译,解压完成之后,将解压包移动到安装目录即可,例如:
sudo mv mongodb-linux-x86_64-3.6.14 /usr/local/mongodb
配置环境变量:
为方便使用mongodb相关命令,我们可以将mongodb安装目录加入到环境变量(/etc/profile)中,添加以下内容:
# MongoDB
export PATH=$PATH:/usr/local/mongodb/bin
2
创建配置文件:
默认情况下,mongodb运行的相关配置可以在启动时指定,也可以通过读取配置文件,建议采用配置文件形式,在mongodb安装目录下添加配置文件(mongod.conf):
# 指定数据库路径
dbpath=/usr/local/mongodb/data/db
# 使用追加的方式写日志
logpath=/usr/local/mongodb/log/mongodb.log
# 使用追加的方式写日志
logappend = true
# 绑定服务IP
bind_ip=127.0.0.1
# 服务器端口
port = 27017
# 以守护进程的方式运行MongoDB,创建服务器进程
fork = true
# PID File 的完整路径
pidfilepath=/usr/local/mongodb/var/mongod.pid
# 启动web界面,端口28017
httpinterface=true
# 不启用验证
noauth=true
# 最大同时连接数,默认2000
maxConns=2000
2
3
4
5
6
7
8
9
10
11
12
13
14
15
16
17
18
19
20
启动Mongodb:
/usr/local/mongodb/bin/mongod --config /usr/local/mongodb/mongod.conf
/usr/local/mongodb/bin/mongod -f /usr/local/mongodb/mongod.conf
2
# MongoDB基本概念
| SQL术语/概念 | MongoDB术语/概念 | 解释/说明 |
|---|---|---|
| database | database | 数据库 |
| table | collection | 数据库表/集合 |
| row | document | 数据记录行/文档 |
| column | field | 数据字段/域 |
| index | index | 索引 |
| table joins | 表连接,MongoDB不支持 | |
| primary key | primary key | 主键,MongoDB自动将_id字段设置为主键 |
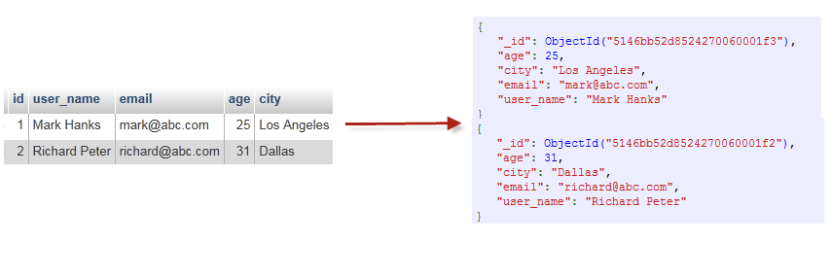
通过下图实例,我们也可以更直观的了解Mongo中的一些概念:
# MongoDB常用命令
通过mongo命令(MongoDB客户端)可以连接到Mongod(MongoDB服务端,类似于mysql与mysql的关系):
gitlib@devops:/usr/local/mongodb/bin$ ./mongo
MongoDB shell version: 3.0.6
connecting to: test
>
2
3
4
常见操作命令:
# 查看该服务器上所有的数据库
# 命令:show dbs

> show dbs
apps   0.078GB
local  0.078GB
2
3
4
5
# 查看数据库中的表
# 命令:show collections

> show collections
apps
system.indexes
2
3
4
5
# 创建数据库/切换到数据库
# 命令:use dbname
> use apps
switched to db apps
2
3
# 查看当前数据库
# 命令:db

> db
apps
2
3
4
# 显示数据库操作命令
# 命令:db.help() 、db.dbname.help()

> db.help()
DB methods:
	db.adminCommand(nameOrDocument) - switches to 'admin' db, and runs command [ just calls db.runCommand(...) ]
	db.auth(username, password)
	db.cloneDatabase(fromhost)
	db.commandHelp(name) returns the help for the command
	...
2
3
4
5
6
7
8
9
# 删除数据库
# 命令:db.dropDatabase() // 删除当前数据库,默认为 test

> db.dropDatabase()
{ "dropped" : "apps", "ok" : 1 }
2
3
4
# 创建集合
# 命令:db.createCollection(tablename,options) //options是可选参数, 指定有关内存大小及索引的选项

> db.createCollection("user")
{ "ok" : 1 }
2
3
4
# 显示所有集合
# 命令:show collections

> show collections
system.indexes
user
2
3
4
5
# 删除集合
# 命令:db.colname.drop()

> db.user.drop()
true
2
3
4
# 添加文档
# 命令:db.colname.insert(data)

> db.user.insert({"name":"gitlib"});
WriteResult({ "nInserted" : 1 })
2
3
4
# 更新文档
# 命令:db.colname.update(query, update,{upsert,multi,writeConcern})
参数说明:
- query : update的查询条件,类似sql update查询内where后面的。
- update : update的对象和一些更新的操作符(如$,$inc...)等,也可以理解为sql update查询内set后面的
- upsert : 可选,这个参数的意思是,如果不存在update的记录,是否插入objNew,true为插入,默认是false,不插入。
- multi : 可选,mongodb 默认是false,只更新找到的第一条记录,如果这个参数为true,就把按条件查出来多条记录全部更新。
- writeConcern :可选,抛出异常的级别。
> db.user.update({"name":"gitlib"},{"name":"gitib2"})
WriteResult({ "nMatched" : 1, "nUpserted" : 0, "nModified" : 1 })
2
# 删除文档
# 命令:db.colname.remove(query,justOne,writeConcern)
# 删除所有数据: db.colname.remove({})
2
参数说明:
- query :(可选)删除的文档的条件。
- justOne : (可选)如果设为 true 或 1,则只删除一个文档,如果不设置该参数,或使用默认值 false,则删除所有匹配条件的文档。
- writeConcern :(可选)抛出异常的级别
> db.user.remove({"name":"gitib2"})
WriteResult({ "nRemoved" : 1 })
2
# 查询文档
# 命令:db.colname.find(query)
> db.user.find()
{ "_id" : ObjectId("5d849637696385dce0f29d94"), "name" : "gitlib" }
> db.user.find({"name":"git"})
2
3
4
# MongoDB索引
索引通常能够极大的提高查询的效率,如果没有索引,MongoDB在读取数据时必须扫描集合中的每个文件并选取那些符合查询条件的记录。
# 命令:db.colname.createIndex({"key1":1, "key2":-1}) // 1升序,-1降序

> db.collection.createIndex({"key":1})
{
	"createdCollectionAutomatically" : true,
	"numIndexesBefore" : 1,
	"numIndexesAfter" : 2,
	"ok" : 1
}
2
3
4
5
6
7
8
9
createIndex() 接收可选参数,可选参数列表如下:
| Parameter | Type | Description |
|---|---|---|
| background | Boolean | 建索引过程会阻塞其它数据库操作,background可指定以后台方式创建索引,即增加 "background" 可选参数。 "background" 默认值为false。 |
| unique | Boolean | 建立的索引是否唯一。指定为true创建唯一索引。默认值为false. |
| name | string | 索引的名称。如果未指定,MongoDB的通过连接索引的字段名和排序顺序生成一个索引名称。 |
| expireAfterSeconds | integer | 指定一个以秒为单位的数值,完成 TTL设定,设定集合的生存时间。 |
# 查看集合索引
# 命令:db.user.getIndexes()

> db.user.getIndexes()
[
	{
		"v" : 1,
		"key" : {
			"_id" : 1
		},
		"name" : "_id_",
		"ns" : "apps.user"
	}
]
2
3
4
5
6
7
8
9
10
11
12
13
# 删除集合指定索引
# 命令:db.colname.dropIndex('索引名称')

> db.user.createIndex({'key':-1},{'name':'key'})
{
	"createdCollectionAutomatically" : false,
	"numIndexesBefore" : 1,
	"numIndexesAfter" : 2,
	"ok" : 1
}
> db.user.dropIndex('key')
{ "nIndexesWas" : 2, "ok" : 1 }
2
3
4
5
6
7
8
9
10
11
# 删除集合所有索引
# 命令:db.colname.dropIndexes()

> db.user.dropIndexes()
{
	"nIndexesWas" : 1,
	"msg" : "non-_id indexes dropped for collection",
	"ok" : 1
}
2
3
4
5
6
7
8
# 查看集合索引大小
# 命令:db.colname.totalIndexSize()

> db.user.totalIndexSize()
8176
2
3
4
# MongoDB查询
# MongoDB 条件语句
如果你熟悉常规的 SQL 数据,通过下表可以更好的理解 MongoDB 的条件语句查询:
| 操作 | 格式 | 范例 | RDBMS中的类似语句 |
|---|---|---|---|
| 等于 | {<key>:<value>} | db.colname.find({"name":"gi tlib"}).pretty() | where by = 'gitlib' |
| 小于 | {<key>:{$lt:<value>}} | ``db.colname.find({"name":{$lt:50}}).pretty()|where name < 50` | |
| 小于或等于 | {<key>:{$lte:<value>}} | ``db.colname.find({"name":{$lte:50}}).pretty()|where name <= 50` | |
| 大于 | {<key>:{$gt:<value>}} | db.colname.find({"name":{$gt:50}}).pretty() | where name > 50 |
| 大于或等于 | {<key>:{$gte:<value>}} | db.colname.find({"name":{$gte:50}}).pretty() | where name >= 50 |
| 不等于 | {<key>:{$ne:<value>}} | db.colname.find({"name":{$ne:50}}).pretty() | where name != 50 |
示例:
> db.user.find({"key":{$gt:0}})
{ "_id" : ObjectId("5d849637696385dce0f29d94"), "key" : 1, "name" : "gitlib" }
> db.user.find({"key":{$lt:2}})
{ "_id" : ObjectId("5d849637696385dce0f29d94"), "key" : 1, "name" : "gitlib" }
2
3
4
# MongoDB AND 条件
MongoDB 的 find() 方法可以传入多个键(key),每个键(key)以逗号隔开,即常规 SQL 的 AND 条件。
命令:db.colname.find({key1:value1, key2:value2})

> db.user.find({"name":"gitlib","key":1})
{ "_id" : ObjectId("5d849637696385dce0f29d94"), "key" : 1, "name" : "gitlib" }
2
3
4
# MongoDB OR 条件
MongoDB OR 条件语句使用了关键字 $or:
命令:db.col.find({$or: [{key1: value1}, {key2:value2}]})

> db.user.find({$or:[{"name":"gitlib2"},{"name":"gitlib"}]})
{ "_id" : ObjectId("5d849637696385dce0f29d94"), "key" : 1, "name" : "gitlib" }
2
3
4
# MongoDB $type 操作符
MongoDB中文档的数据结构和JSON 基本一样,在MongoDB中这种数据结构称为BJSON(Binary JSON )。$type操作符是基于BSON类型来检索集合中匹配的数据类型,并返回结果。
MongoDB 中可以使用的类型如下表所示:
| 类型 | 数字 | 备注 |
|---|---|---|
| Double | 1 | |
| String | 2 | |
| Object | 3 | |
| Array | 4 | |
| Binary data | 5 | |
| Undefined | 6 | 已废弃。 |
| Object id | 7 | |
| Boolean | 8 | |
| Date | 9 | |
| Null | 10 | |
| Regular Expression | 11 | |
| JavaScript | 13 | |
| Symbol | 14 | |
| JavaScript (with scope) | 15 | |
| 32-bit integer | 16 | |
| Timestamp | 17 | |
| 64-bit integer | 18 | |
| Min key | 255 | Query with -1. |
| Max key | 127 |
示例:
> db.user.find({"name":{$type:2}})
{ "_id" : ObjectId("5d849637696385dce0f29d94"), "key" : 1, "name" : "gitlib" }
2
# MongoDB Limit() 方法
如果你需要在MongoDB中读取指定数量的数据记录,可以使用MongoDB的Limit方法,limit()方法接受一个数字参数,该参数指定从MongoDB中读取的记录条数。
# 命令:db.colname.find(query).limit(num)

> db.user.find({"name":{$type:2}}).limit(2)
{ "_id" : ObjectId("5d849637696385dce0f29d94"), "key" : 1, "name" : "gitlib" }
2
3
4
# MongoDB Skip() 方法
除了可以使用limit()方法来读取指定数量的数据外,还可以使用skip()方法来跳过指定数量的数据,skip方法同样接受一个数字参数作为跳过的记录条数。
# 命令:db.colname.find(query).limit(num).skip(num)

> db.user.find()
{ "_id" : ObjectId("5d849637696385dce0f29d94"), "key" : 1, "name" : "gitlib" }
{ "_id" : ObjectId("5d849f9a67bfad0168f5c014"), "name" : "gitlib2", "key" : 2 }
> db.user.find().limit(1).skip(1)
{ "_id" : ObjectId("5d849f9a67bfad0168f5c014"), "name" : "gitlib2", "key" : 2 }
2
3
4
5
6
7
# MongoDB sort() 方法
在 MongoDB 中使用 sort() 方法对数据进行排序,sort() 方法可以通过参数指定排序的字段,并使用 1 和 -1 来指定排序的方式,其中 1 为升序排列,而 -1 是用于降序排列。
# 命令:db.colname.find().sort({key:1})

> db.user.find().sort({"key":1})
{ "_id" : ObjectId("5d849637696385dce0f29d94"), "key" : 1, "name" : "gitlib" }
{ "_id" : ObjectId("5d849f9a67bfad0168f5c014"), "name" : "gitlib2", "key" : 2 }
> db.user.find().sort({"key":-1})
{ "_id" : ObjectId("5d849f9a67bfad0168f5c014"), "name" : "gitlib2", "key" : 2 }
{ "_id" : ObjectId("5d849637696385dce0f29d94"), "key" : 1, "name" : "gitlib" }
2
3
4
5
6
7
8
# PHP7 MongoDB 扩展安装
我们采用源码安装MongoDB扩展:
# 下载扩展包
wget http://pecl.php.net/get/mongodb-1.6.0.tgz
# 解压
tar zxvf mongodb-1.6.0.tgz
cd mongodb-1.6.0/
# 构建
/usr/local/php7/bin/phpize
# 配置编译参数
./configure --with-php-config=/usr/local/php7/bin/php-config
# 编译
make
# 安装
sudo make install
2
3
4
5
6
7
8
9
10
11
12
13
添加MongoDB扩展:
安装完mongoDB扩展之后,需要修改PHP配置文件,将mongoDB扩展加进去:
## 修改php.ini
sudo vim /usr/local/php7/etc/php.ini

## 添加如下内容:
# 添加Mongodb扩展
extension=mongodb
2
3
4
5
6
添加完mongoDB扩展之后,重启php, 就可以在phpinfo()函数输出中看到,或者运行命令检查:
/usr/local/php7/bin/php -m # 查看安装的模块
# PHP实践操作
# 连接MongoDB
<?php

$manager = new MongoDB\Driver\Manager("mongodb://127.0.0.1:27017");
2
3
# 添加文档
$bulk = new MongoDB\Driver\BulkWrite;
$bulk->insert(['x' => 1, 'name'=>'gitlib1', 'url' => 'https://gitlib.com']);
$bulk->insert(['x' => 2, 'name'=>'gitlib2', 'url' => 'https://gitlib.com']);
$bulk->insert(['x' => 3, 'name'=>'gitlib3', 'url' => 'https://gitlib.com']);
$manager->executeBulkWrite('app.user', $bulk);
2
3
4
5
# 删除文档
// 删除文档
$bulk = new MongoDB\Driver\BulkWrite;
$bulk->delete(['x' => 1], ['limit' => 1]);   // limit 为 1 时,删除第一条匹配数据
$bulk->delete(['x' => 2], ['limit' => 0]);   // limit 为 0 时,删除所有匹配数据

$writeConcern = new MongoDB\Driver\WriteConcern(MongoDB\Driver\WriteConcern::MAJORITY, 1000);
$result = $manager->executeBulkWrite('app.user', $bulk, $writeConcern);
2
3
4
5
6
7
# 更新文档
$bulk = new MongoDB\Driver\BulkWrite;
$bulk->update(
    ['x' => 2],
    ['$set' => ['name' => 'Gitlib', 'url' => 'gitlib.com']],
    ['multi' => false, 'upsert' => false]
);

$writeConcern = new MongoDB\Driver\WriteConcern(MongoDB\Driver\WriteConcern::MAJORITY, 1000);
$result = $manager->executeBulkWrite('app.user', $bulk, $writeConcern);
2
3
4
5
6
7
8
9
# 查询文档
$filter = ['x' => ['$gt' => 1]];
$options = [
    'projection' => ['_id' => 0],
    'sort' => ['x' => -1],
];

// 查询数据
$query = new MongoDB\Driver\Query($filter, $options);
$cursor = $manager->executeQuery('app.user', $query);

foreach ($cursor as $document) {
    print_r($document);
}
2
3
4
5
6
7
8
9
10
11
12
13
关于更多MongoDB操作请参考:https://www.php.net/manual/en/book.mongodb.php