 Docker快速入门
# Docker的架构
Docker是一种C/S架构,所谓的C/S架构就是有Client端和服务端。其中Docker Engine包括一下几个组件。
- 常驻的后台进程Dockerd;
- 一个用来和Dockerd交互的REST API Server;
- 命令行CLI接口,通过和REST API进行交互。
如下图所示:
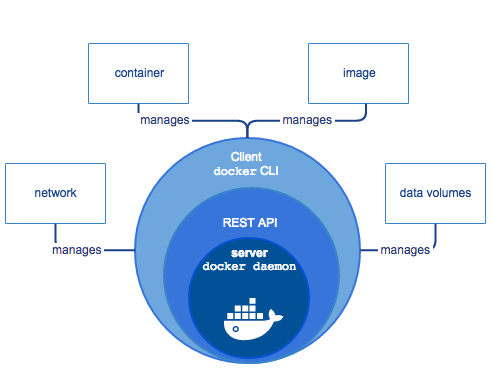
Docker Client负责和Docker daemon进程通信,Docker daemon负责构建、运行和分发Docker容器。Docker Client和Docker daemon可以运行在一台主机上,也可以连接远程的Docker daemon。Docker Client和Docker daemon使用REST API通过UNIX套接字和网络接口进行通信。
下图是整个Docker运行的示意图:
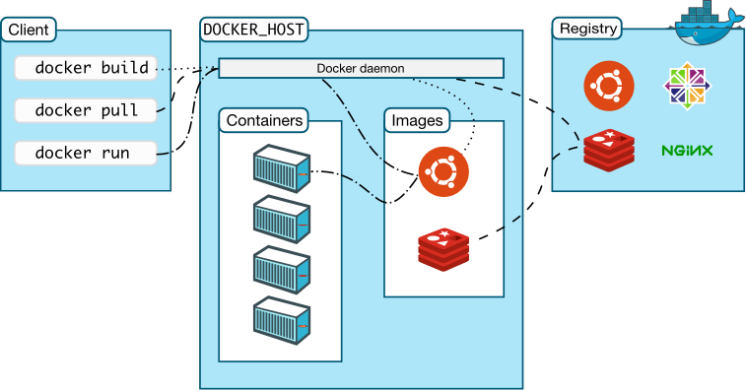
其中:
- Docker Damon:dockerd,用来监听 Docker API 的请求和管理 Docker 对象,比如镜像、容器、网络和 Volume。
- Docker Client:docker,docker client 是我们和 Docker 进行交互的最主要的方式方法,比如我们可以通过 docker run 命令来运行一个容器,然后我们的这个 client 会把命令发送给上面的 Dockerd,让他来做真正事情。
- Docker Registry:用来存储 Docker 镜像的仓库,Docker Hub 是 Docker 官方提供的一个公共仓库,而且 Docker 默认也是从 Docker Hub 上查找镜像的,当然你也可以很方便的运行一个私有仓库,当我们使用 docker pull 或者 docker run 命令时,就会从我们配置的 Docker 镜像仓库中去拉取镜像,使用 docker push 命令时,会将我们构建的镜像推送到对应的镜像仓库中。
- Images:镜像,镜像是一个只读模板,带有创建 Docker 容器的说明,一般来说的,镜像会基于另外的一些基础镜像并加上一些额外的自定义功能。比如,你可以构建一个基于 Centos 的镜像,然后在这个基础镜像上面安装一个 Nginx 服务器,这样就可以构成一个属于我们自己的镜像了。
- Containers:容器,容器是一个镜像的可运行的实例,可以使用 Docker REST API 或者 CLI 来操作容器,容器的实质是进程,但与直接在宿主执行的进程不同,容器进程运行于属于自己的独立的命名空间 (opens new window)。因此容器可以拥有自己的 root 文件系统、自己的网络配置、自己的进程空间,甚至自己的用户 ID 空间。容器内的进程是运行在一个隔离的环境里,使用起来,就好像是在一个独立于宿主的系统下操作一样。这种特性使得容器封装的应用比直接在宿主运行更加安全。
- 底层技术支持:Namespaces(做隔离)、CGroups(做资源限制)、UnionFS(镜像和容器的分层) the-underlying-technology Docker 底层架构分析。
Docker在1.11之前主要是通过docker daemon来处理client的请求,容器的相关操作都是通过docker daemon来完成。从1.11之后,并不是简简单单的通过docker daemon来处理了,它集成了Containerd、RunC等多个组件。这些组件之间相互协作来完成客户端请求和容器管理。
现在的架构图如下:
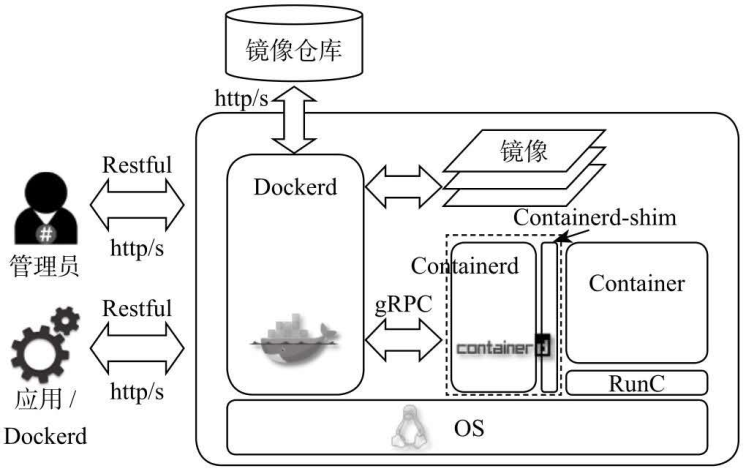
下面对这些组件进行一一说明。
# Dockerd
Dockerd是一个守护进程,它可以通过TCP和UNIX Domain Socket两种途径接收客户端的HTTP请求,这些请求都是Restful风格。也就是说Dockerd是面向用户的,它是对容器操作相关的API的上层封装。
# Containerd
Containerd对外提供gRPC形式的API,API的定义中不再包含于集群、编排等相关功能,但是它也不是简单的将Docker API照搬过来,而是进行了更细粒度的抽象,并且还实现了监控管理、多租户的接口,方便外部应用利用这套API来实现高效和定制容器管理功能。
# Containerd-shim
在默认情况下,Docker守护进程在停止容器的时候会发送SIGTERM信号,而容器进程有可能错误的忽略该信号,为了能够正确的处理系统信号等相关特性,通过Containerd-shim来保证能够正确处理各种信号,所以每个容器都会对应一个Containerd-shim实例。它对外的接口是ttRPC。
# RunC
OCI 定义了容器运行时标准,runC 是 Docker 按照开放容器格式标准(OCF, Open Container Format)制定的一种具体实现。runC 是从 Docker 的 libcontainer 中迁移而来的,实现了容器启停、资源隔离等功能。Docker 默认提供了 docker-runc 实现,事实上,通过 containerd 的封装,可以在 Docker Daemon 启动的时候指定 runc 的实现。
runc不是以守护进程的方式来执行,它会将容器的运行配置和状态数据记录在json文件中,当Containerd要求Runc执行例如停止、暂停容器等操作,它会根据容器ID在配置好的路径下找到该json文件,然后再利用json中记录的容器进程PID以及CGroup文件路径等作为参数来调用操作系统API,并完成自己的任务。
由RunC启动的容器进程的标准输入和标准输出被重定向到管道中,并在Contained中被关联到FIFO文件中,这些FIFO文件是在Dockerd中创建的,并通过gRPC请求将它们的路径名传递到Contained中。
# Docker的基本操作
用户在使用Docker,需要使用Docer命令行工具docker和Docker daemon建立通信,Docker daemon是Docker的守护进程,负责接收并分发执行Docker命令。
为了了解Docker命令行工具的概况,我们可以使用Docker命令或Docker help命令来获取Docker的命令清单,如下:
[root@hjkj ansible]# docker
Usage:	docker [OPTIONS] COMMAND

Management Commands:
  builder     Manage builds
  config      Manage Docker configs
  container   Manage containers
  engine      Manage the docker engine
  image       Manage images
  network     Manage networks
  node        Manage Swarm nodes
  plugin      Manage plugins
  secret      Manage Docker secrets
  service     Manage services
  stack       Manage Docker stacks
  swarm       Manage Swarm
  system      Manage Docker
  trust       Manage trust on Docker images
  volume      Manage volumes

Commands:
  attach      Attach local standard input, output, and error streams to a running container
  build       Build an image from a Dockerfile
  commit      Create a new image from a container's changes
	......
  update      Update configuration of one or more containers
  version     Show the Docker version information
  wait        Block until one or more containers stop, then print their exit codes
2
3
4
5
6
7
8
9
10
11
12
13
14
15
16
17
18
19
20
21
22
23
24
25
26
27
28
29
可以看到Docker的命令非常多,现在Docker官方已经将Docker命令分组了,当前以前的命令方式还是保留着。值得一提的是docker命令执行一般都需要获取root权限,因为Docker的命令行工具docker和Docker daemon是同一个二进制文件,而Docker daemon负责接收来自docker的命令,它的运行需要root权限。同时,Docker从0.5.2版本开始,Docker daemon默认绑定了一个UNIX Socket来代替原有的TCP端口,改UNIX Socket默认是属于root用户的。因此在执行docker命令时,需要root权限。
docker有非常多的命令,相应的命令都可以通过docker COMMAND --help来查看具体如何使用,包括子命令的使用方法以及可用的操作参数。
我们将docker的子命令进行如下分类:
| 子命令分类 | 子命令 |
|---|---|
| Docker环境信息 | info version |
| 容器生命周期管理 | create exec kill pause restart rm run start stop unpause |
| 镜像仓库命令 | login logout pull push search |
| 镜像管理 | build images import load rmi save tag commit |
| 容器运维操作 | attach export inspect port ps rename stats top wait cp diff update |
| 容器资源管理 | volume network |
| 系统日志信息 | events history logs |
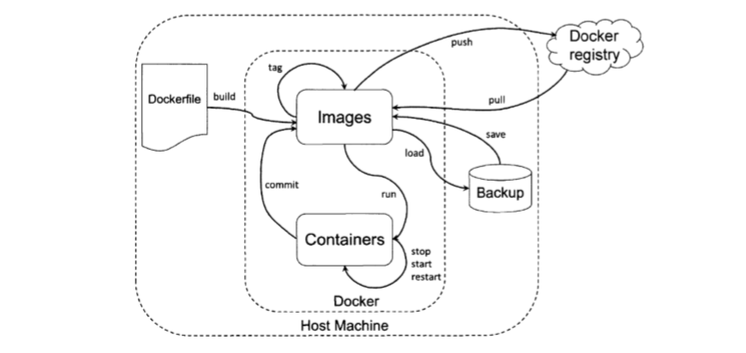
docker的命令结构图如下:
# Docker的环境信息
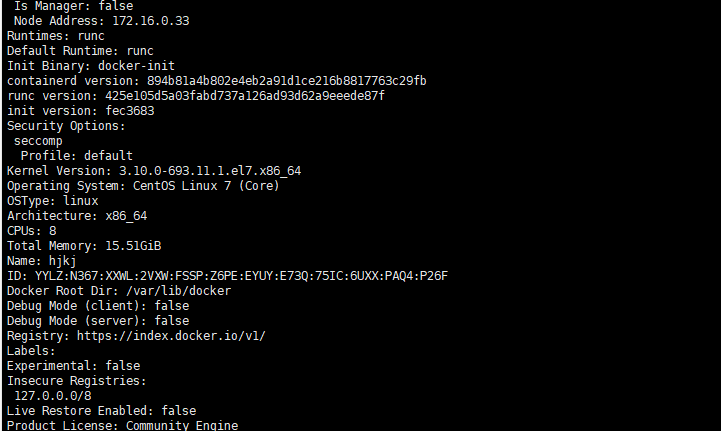
docker info命令用于查看Docker是否正确安装,如果正确安装,会输出Docker的配置信息。 输入docker info,可以看到一下的信息
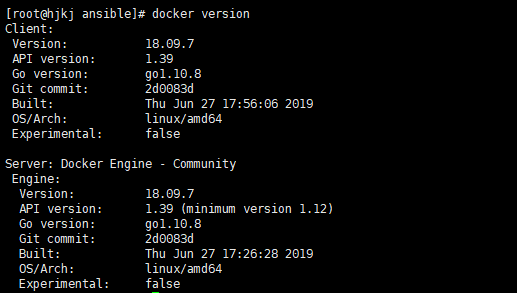
输入docker version可以看到当前使用的docker版本
# Docker的生命周期管理
Docker生命周期管理涉及容器的启动、停止等功能,下面介绍几个常用的命令。
# docker run
docker run的使用语法:docker run [OPTIONS] IMAGE [COMMAND] [ARG...]
详细可以使用docker run --help来查看具体的参数。
docker run用来基于特定的镜像创建一个容器,并且依据选项来控制改容器。具体使用实例如下:
[root@hjkj ansible]# docker run busybox echo "hello world"
Unable to find image 'busybox:latest' locally
latest: Pulling from library/busybox
ee153a04d683: Pull complete
Digest: sha256:9f1003c480699be56815db0f8146ad2e22efea85129b5b5983d0e0fb52d9ab70
Status: Downloaded newer image for busybox:latest
hello world

[root@hjkj ansible]# docker run busybox echo "hello world"
hello world
2
3
4
5
6
7
8
9
10
11
从上面可以看到这个命令我使用的两次,第一次是由于我本地没有busybox这个镜像,它需要到官方站点去拉取镜像,然后再运行。第二次由于我们上面已经拉取过了,那么busybox这个镜像就保存在本地了,我们再次运行就不需要再去拉取进行,直接运行即可。
docker run的参数很多,可以通过docker run --help来查看具体的参数,docker run常用的几个参数如下:
- -i :表示使用交互模式,始终保持输入流开放
- -t :表示分配一个伪终端,一般和-i结合使用
- --name :指定容器的名字,若不指定,则随机分配一个名字
- -c :用于给运行的容器分配cpu的权重值
- -m : 用于给容器分配内存总量
- -v :用于挂载一个volume,可以同时使用多个-v
- -p :用于将容器内的端口暴露给宿主机,常用格式为 -p hostPort:containerPort,如果不指定hostPort,则在宿主机上随机生成一个端口
# docker start/stop/restart
docker start/stop/restart容器通常是对一个以存在的容器进行操作,它们分别是启动、关闭和重启容器。其中docker start命令可以使用-i来进入交互模式,使用-a来附加标准输入、输出或错误输出。docker stop和docker restart 命令使用-t选项来设定容器停止前的等待时间。
# Docker镜像仓库命令
Docker Registry是Docker的镜像仓库,用户可以通过Docker Client和Docker Registry进行通信,以完成镜像的搜搜索、下载、上传等操作。
# docker pull
docker pull是Docker中常用命令,用于将image或者repository从Registry中拉取下来。该命令的使用方法如下:
# docker pull --help
Usage:	docker pull [OPTIONS] NAME[:TAG|@DIGEST]
Pull an image or a repository from a registry
Options:
  -a, --all-tags                Download all tagged images in the repository
      --disable-content-trust   Skip image verification (default true)
2
3
4
5
6
7
使用docker pull的时候需要指定版本,如果不指定,默认版本是latest。
# docker push
docker push命令用于将本地的image或repository推送到Registry中。该命令的使用方法如下:
# docker push --help
Usage:	docker push [OPTIONS] NAME[:TAG]
Push an image or a repository to a registry
Options:
      --disable-content-trust   Skip image signing (default true)
2
3
4
5
6
在使用docker push的时候需要使用docker login进行登录。
# Docker镜像管理
# docker images
docker images命令可以列出主机上的镜像,默认只列出最顶层的镜像,可以使用-a来列出所有的镜像。其使用方法如下:
# docker images --help
Usage:	docker images [OPTIONS] [REPOSITORY[:TAG]]
List images
Options:
  -a, --all             Show all images (default hides intermediate images)
      --digests         Show digests
  -f, --filter filter   Filter output based on conditions provided
      --format string   Pretty-print images using a Go template
      --no-trunc        Don't truncate output
  -q, --quiet           Only show numeric IDs
2
3
4
5
6
7
8
9
10
11
# docker rm/rmi
这两个命令的作用都是删除,其中docker rm是用于删除容器,docker rmi是用于删除镜像。它们的使用方法如下:
# docker rm --help
Usage:	docker rm [OPTIONS] CONTAINER [CONTAINER...]
Remove one or more containers
Options:
  -f, --force     Force the removal of a running container (uses SIGKILL)
  -l, --link      Remove the specified link
  -v, --volumes   Remove the volumes associated with the container

# docker rmi --help
Usage:	docker rmi [OPTIONS] IMAGE [IMAGE...]
Remove one or more images
Options:
  -f, --force      Force removal of the image
      --no-prune   Do not delete untagged parents
2
3
4
5
6
7
8
9
10
11
12
13
14
值得一提的是,用docker rmi来删除镜像的时候,如果有基于该镜像的启动的容器存在,则需要先删除容器,再删除镜像。当然这两个命令都有-f选项,用于强制删除存在容器的镜像或启动中的容器。
# Docker运维操作
# docker attach
docker attach可以连接正在运行的容器,观察该容器的运行情况,或与容器的主机进程进行交互式操作。其使用方法如下:
# docker attach --help
Usage:	docker attach [OPTIONS] CONTAINER
Attach local standard input, output, and error streams to a running container
Options:
      --detach-keys string   Override the key sequence for detaching a container
      --no-stdin             Do not attach STDIN
      --sig-proxy            Proxy all received signals to the process (default true)
2
3
4
5
6
7
8
# docker inspect
docker inspect命令可以查看镜像和容器的详细信息,默认会列出全部信息,可以通过--format参数来指定输入的模板格式,以便输出特定的信息。该命令的使用方法如下:
# docker inspect --help
Usage:	docker inspect [OPTIONS] NAME|ID [NAME|ID...]
Return low-level information on Docker objects
Options:
  -f, --format string   Format the output using the given Go template
  -s, --size            Display total file sizes if the type is container
      --type string     Return JSON for specified type
2
3
4
5
6
7
8
# docker ps
docker ps命令可以查看容器的相关信息,默认只会显示正在运行的容器信息。其使用方法如下:
# docker ps --help
Usage:	docker ps [OPTIONS]
List containers
Options:
  -a, --all             Show all containers (default shows just running)
  -f, --filter filter   Filter output based on conditions provided
      --format string   Pretty-print containers using a Go template
  -n, --last int        Show n last created containers (includes all states) (default -1)
  -l, --latest          Show the latest created container (includes all states)
      --no-trunc        Don't truncate output
  -q, --quiet           Only display numeric IDs
  -s, --size            Display total file sizes
2
3
4
5
6
7
8
9
10
11
12
13
docker ps 常用-a和-l,-a查看所有的容器,-l查看最新创建的容器,包括不在运行的容器。
# 其他子命令
# docker commit
docker commit是将容器固化为一个新的镜像,当需要指定特定的镜像的时候,会对容器的配置进行修改,然后通过commit将这些修改保存起来,使其不会因为容器的停止而丢失。使用方法如下:
# docker commit --help
Usage:	docker commit [OPTIONS] CONTAINER [REPOSITORY[:TAG]]
Createza new image from a container's changes

Options:
  -a, --author string    Author (e.g., "John Hannibal Smith <hannibal@a-team.com>")
  -c, --change list      Apply Dockerfile instruction to the created image
  -m, --message string   Commit message
  -p, --pause            Pause container during commit (default true)
2
3
4
5
6
7
8
9
10
提交保存时,只能使用正在运行的容器来制作新的镜像。
# docker events/logs/history
这三个命令都是用于查看Docker的系统日志信息,其中events会打印出实时的系统事件,history会打印指定镜像的历史版本信息,即构建该镜像的每一层镜像的命令记录,logs命令会打印容器内进程的运行日志。其使用方法如下:
# docker events --help
Usage:	docker events [OPTIONS]
Get real time events from the server
Options:
  -f, --filter filter   Filter output based on conditions provided
      --format string   Format the output using the given Go template
      --since string    Show all events created since timestamp
      --until string    Stream events until this timestamp

# docker logs --help
Usage:	docker logs [OPTIONS] CONTAINER
Fetch the logs of a container
Options:
      --details        Show extra details provided to logs
  -f, --follow         Follow log output
      --since string   Show logs since timestamp (e.g. 2013-01-02T13:23:37) or relative (e.g. 42m for 42 minutes)
      --tail string    Number of lines to show from the end of the logs (default "all")
  -t, --timestamps     Show timestamps
      --until string   Show logs before a timestamp (e.g. 2013-01-02T13:23:37) or relative (e.g. 42m for 42 minutes)

# docker history --help
Usage:	docker history [OPTIONS] IMAGE
Show the history of an image
Options:
      --format string   Pretty-print images using a Go template
  -H, --human           Print sizes and dates in human readable format (default true)
      --no-trunc        Don't truncate output
  -q, --quiet           Only show numeric IDs
2
3
4
5
6
7
8
9
10
11
12
13
14
15
16
17
18
19
20
21
22
23
24
25
26
27
28
29
# Docker存储卷
默认情况下,容器会随着用户删除而消失,包括容器里面的数据。如果我们要对容器里面的数据进行长久保存,就不得不引用存储卷的概念。
在容器中管理数据持久化主要有两种方式:
- 数据卷(data volumes)
- 挂载目录(Bind volumes)
# 数据卷
数据卷是一个可供一个或多个容器使用的共同目录,它提供很多有用的特性:
- 数据卷可以在容器之间共享和重用;
- 对数据卷的修改会立马生效;
- 对数据卷的更新不会影响镜像;
- 数据卷默认会一直存在,即使容器被删除;
注意:数据卷的使用类似于Linux下对目录进行mount,镜像中被指定的挂载点中的文件会被隐藏,显示的是我们挂载的数据卷。
数据卷的常用命令是docker volume命令,常规用法如下:
# docker volume --help
Usage:	docker volume COMMAND
Manage volumes
Commands:
  create      Create a volume
  inspect     Display detailed information on one or more volumes
  ls          List volumes
  prune       Remove all unused local volumes
  rm          Remove one or more volumes

Run 'docker volume COMMAND --help' for more information on a command.
2
3
4
5
6
7
8
9
10
11
创建数据卷:
docker volume create my_volume
查看数据卷:
# docker volume ls
DRIVER              VOLUME NAME
local               7a9cbb48630c66180ba226974aa9307a502ce4c99648be48e1a0cfcbe4573854
local               861cb1d1c824570a426a6b2599357b6d66818cd98a36010857cb7d753312d11d
local               my_volume
local               mydata
local               nginx_volume
local               vol_simple
local               wpdata
2
3
4
5
6
7
8
9
查看数据卷的详细信息:
# docker volume inspect my_volume
[
    {
        "CreatedAt": "2019-07-28T13:01:27+08:00",
        "Driver": "local",
        "Labels": {},
        "Mountpoint": "/var/lib/docker/volumes/my_volume/_data",
        "Name": "my_volume",
        "Options": {},
        "Scope": "local"
    }
]
2
3
4
5
6
7
8
9
10
11
12
13
启动一个容器挂载数据卷,挂载数据卷的方法有两种:
1、用-v或者--volume;
# docker run -it --rm --name my_app -v my_volume:/data/apps busybox
2、用--mount;
# docker run -it --rm --name my_app --mount source=my_volume,target=/data/apps busybox
容器启动后可以查看容器信息,就可以看到具体的挂载信息:
# docker inspect my_app
......
"Mounts": [
            {
                "Type": "volume",
                "Name": "my_volume",
                "Source": "/var/lib/docker/volumes/my_volume/_data",
                "Destination": "/data/apps",
                "Driver": "local",
                "Mode": "z",
                "RW": true,
                "Propagation": ""
            }
        ],
......
2
3
4
5
6
7
8
9
10
11
12
13
14
15
删除数据卷:
# docker volume rm my_volume
数据卷是用来持久化容器数据的,它独立于容器的生命周期,如果需要删除容器的同时也移除数据卷,可以使用docker rm -v命令。
如果要清理一些无主的数据卷,可以使用下面命令:
# docker volume prune
# 挂载目录
挂载主机目录和挂载数据卷的方式一样,只是在指定需要挂载的目录是一个全路径目录,比如:
# docker run -it --rm --name my_app -v /tmp/my_app:/data/apps busybox
# docker run -it --rm --name my_app --mount type=bind,source=/tmp/my_app,target=/data/apps busybox
2
从上面知道用-v和--mount都可以进行挂载。如果使用-v来挂载目录,如果本地/tmp/my_app存在,则直接将这个目录挂载到容器上,里面如果有文件等,就可以在容器中直接进行查看。如果本地没有这个目录,则在启动容器的过程中自动创建这个目录。如果使用--mount来挂载目录,如果本地目录不存在,就会报错,比如:
# docker run -it --rm --name my_app --mount type=bind,source=/tmp/my_app/web/data,target=/data/apps busybox
docker: Error response from daemon: invalid mount config for type "bind": bind source path does not exist: /tmp/my_app/web/data.
See 'docker run --help'.
2
3
默认挂载到容器中的目录,docker对其是有读写权限的,用户可以增加readonly参数使其只有只读权限。
# docker run -it --rm --name my_app --mount type=bind,source=/tmp/my_app,target=/data/apps,readonly busybox
/ # cd /data/apps/
/data/apps # ls
/data/apps # touch 1.txt
touch: 1.txt: Read-only file system
2
3
4
5
6
不仅可以挂载目录,还可以挂载单个文件,如下:
# docker run -it --rm --name my_app --mount type=bind,source=/$HOME/.bash_history,target=/data/apps/history busybox
# docker run -it --rm --name my_app -v /$HOME/.bash_history:/data/apps/history busybox
2
3
如果是跨主机使用,可以通过共享存储,比如NFS之类的。这样我们只要挂载NFS的目录,所有的读写操作其他主机也可见。
除了使用上面这两种挂载之外,还可以使用现有容器的挂载,通过--volumes-from命令就可以直接使用其他容器的挂载,比如:
# docker run -it --rm --name my_app -v /$HOME/.bash_history:/data/apps/history busybox
# docker run -it --rm --name new_app --volumes-from my_app busybox
2
这样,my_app和new_app使用的就是同一个挂载卷了。
